Wednesday 13 August 2014

::Crochet::FO:: Pink and Grey Pippy Slippers

Recently I've worn my Brown Pippy Slippers in the company of others and have received lovely comments about how comfy they look.

Side-note: I can't believe I've had these slipper for two years.


I'm not often a selfless maker, but when it comes to my nearest and dearest my selfish making defenses are compromised. (I'm a sucker, I know)
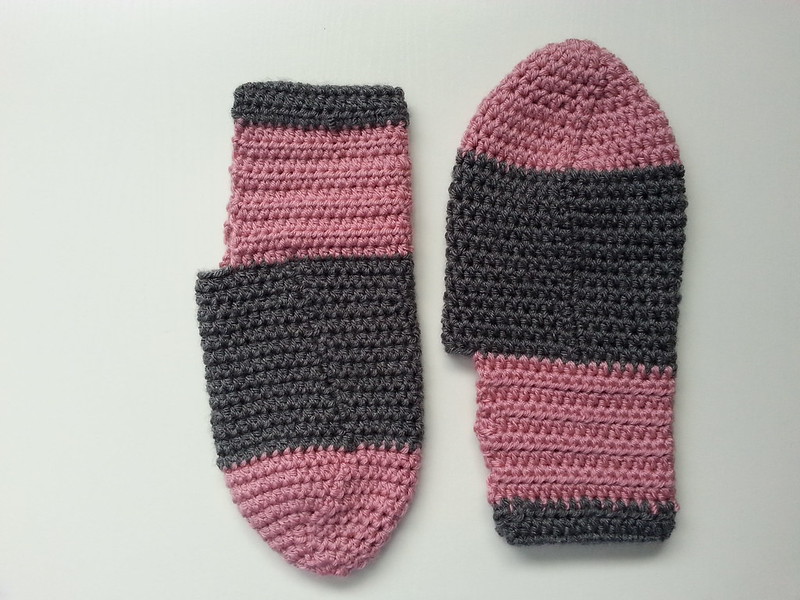
So when my sister put in an order for some slippers in hot pink and grey, of course I said yes; but they would have to be a made of what is in my stash, which meant they were going to be a dusty pink and grey.


These seemed to come together pretty quickly. I might have something to do with making them both at the same time each segment at a time. So I did the goes of both, then the foot of both, then the pink heel and then the grey heel bits. They took me about a week on and off.

I do get a sore wrist from crocheting because I hold the hook like a pencil and flick my wrist to YO, but that's only if I go hard for more than an hour at a time. I find crocheting pretty mellow compared to knitting, because you're only working with one active stitch on the hook.

I made a few changes which I've made note of over on Ravelry.
Side-note: If you're on Ravelry say Hi :)

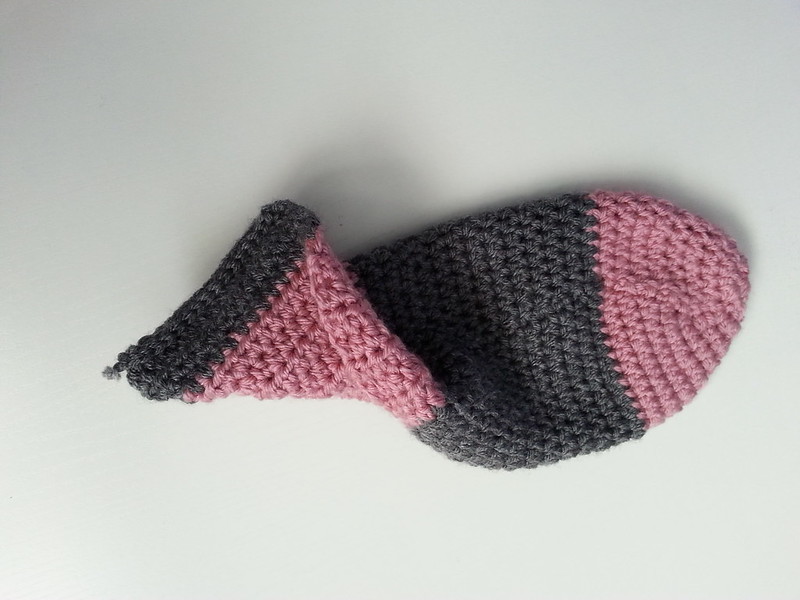
I crocheted the back seam instead of sewing it because that's how I roll :) and because when you're all snuggly and warm on the couch who can be arsed to get up and find a darning needle.


~Numbers~
I forgot to record how much time it took me to make these puppies, but I'm estimating about a 8 hours, but it was probably more.

I'm just estimating how much the yarn was worth because I probably didn't even use a whole ball and they from my stash anyway.

PatternPippy Slippers from Meet Me at Makes - found hereFREE
WoolIn Stash~$3.50
Notions NA $0.00
Time8 hours (* $16-ish Australian minimum wage) $128.00
Total
$131.50

Not cheap for house slippers, but it was still fun to revisit this pattern and do some crochet again.

~Final Comment~
These are pretty cute slippers. I like the colour combo, thinking about it know though I should have put the dark colour at the pressure points of the foot (toe and heel) because they'll probably get dirtiest.
I hope my sis likes them, uses them and appreciates them :)

Question time:
 
Do you crochet?
Do you begrudge making for others?  
What was the last thing you made for someone else?
Leave your answer in the comments :)

Until next time,


Let's connect

Monday 4 August 2014

::Sewing::FO::Teal Peony for the Lady?

I wore this dress out for the first time over the weekend and someone asked if I made the dress and whether I had posted it on my blog. It wasn't until I got home that I realised that I haven't posted about this make here. Wha!?
So here she is on le blog.

I did make this dress over a month ago and posted about it on The Monthly Stitch.


 But, I've got a little secret. The dress wasn't completely finished when I posted it on TMS. I still had to hem the sleeves and skirt and hand stitch the bodice lining to the waist seam. Shhh!
I finished it not too long after posting it, so it's not that big a deal :P


My hair is at the at weird length where it looks like there is a koala attached to my head, but I can't really do much with it. So, I popped on a hat for these photos.
Note to self: Sort out the hair situation.

~Inspiration~
I've been wanting to make this dress for ages.
I've had the pattern printed, pasted and ready to go for awhile now, so when The Monthly Stitch announced that the first challenge for their Indie Pattern Month would be dresses I knew exactly what I was going to make. Thanks TMS for giving me the boot :)
There were quite a few adjustments made to this dress, but I'm pretty pleased with the way it turned out in the end.
I was sewing like women possessed trying to get this puppy sewn up before we headed off for a long-weekend vacation. I took the pictures just as the light was fading over the horizon.

~Pattern Adjustments~
Full Bust Adjustment  C cup to D cup (3/8" spread) - I can never remember whether Colette Patterns are drafted for a C cup or D cup, but I've come up with a way to remember C for Colette Patterns!
When I did the FBA the darts ended up a bit wonky
Moved waist bust dart point and reduced the dart intake by 1/2"
Big Butt Adjustment-cut & pivot at the waistline total of  2 inches spread over to vertical cuts
Lengthened skirt 1 inch all over and an extra 1 inch at the back to compensate for Big Butt Adjustment
Shortened sleeves by 6.5 inches


~Construction~
I  didn't follow the instructions on this one. I don't like facings so I lined the bodice with the main fabric.
So because I went  'off piste' here is a quick summary of my construction steps.
-Sewed darts, in the bodice and bodice lining and joined bodice and lining at the shoulders. Clipped, pressed and finished seams on the overlocker.
- Sewed the bodice and lining together at the neckline pressed clipped and turned
- Sewed the side seams of the bodice and lining - separately, pressed
- Basted the armholes of the bodice and lining together so they wouldn't shift when inserting the sleeve
- Sewed bias tape to the sleeve cap to ease it into the arm hole
- Sewed the sleeve seam
- Inserted the sleeve
- Finished the edges of the pocket pieces on the overlocker & attached them to the skirt pieces. Pressed. Finished the skirt side seams on the overlocker.
- Sewed the skirt pieces together at the side seams, sewing around the pockets
- Gathered sections on the front skirt
- Attached the skirt to the bodice
- Inserted the zipper
- Sewed the lining to the zipper and bodice-skirt seam
- Hemmed the sleeves and skirt.
Pheew!

I have come to the conclusion that I am not a big fan of setting in sleeves. This time I used the "bias tape" trick where instead of gathering the sleeve cap with basting stitches you sew a strip of bias tape to the sleeve cap while keeping it pulled taut. I think it worked pretty well here.

 ~Pattern~
Colette Patterns 1017 (Peony) Version 1 with shortened sleeves and no belt.

~Materials~
Teal poly cotton fabric I've had in my stash for ages.
22" invisible zipper

~Changes I made this time~
Heaps! See the pattern adjustments above!

~What I Like~
- I wasn't sure about the colour initially, but now I quite like it. - When I wore the dress out I got a few compliments on the colour. So that's a definite winner.
- I'm pretty pleased about the success of my Big Butt Adjustment
- I like that the waist seam matches at the zipper
- Pockets!

~What I Don't Like~
- The zipper puckering
- The invisible zipper peaking out
- The fabric - after making my Navy S2444 and this dress I've come to the conclusion that I need to move away from this poly cotton. Too bad I've still got some in my stash :(

~Changes for Next Time~
- Definitely different fabric.
- There are a heap more fitting adjustments I want to do on this dress. I think a big one is to raise the lower armscye on the bodice. I'm thinking that will help a bunch with arm movement. Or maybe I'll have to sew in a gusset. Hmmm.
- I also want to lower the centre and shorten the width of the neckline.
- I also want to re-adjust the waist bust dart on the bodice - change it so that the dart centre is vertical and not at an angle.

~Numbers~
Pattern
Colette Patterns 1017 (Peony) view
$14.00
FabricTeal Poly cotton x 4m - had in stash can't remember cost$-
Notions -Thread - had in stash
-Bias Tape (for sleeve easing) - had in stash
-22" Invisible Zipper
$-
$-
$5.00
Time2 hours pattern adjustments
11 hours sewing
13 hours (* $16-ish Australian minimum wage)
$208.00
Total
$227.00

This is the first time that I've used the Peony pattern so I've included it in the tally.
Also, because it is the first time I've used the pattern there was a lot of time spent making pattern adjustments.

A lot of the sewing time included the muslin making process, so lots of sewing, seam ripping, re-cutting fabric and sewing again.  I also experimented with techniques for setting in the sleeves so that took some time too.

In future I want to break down my sewing time a bit more. While I was making this project I was using a time tracker app on my phone. I think a project based time tracker would be a better option in future because the time tracker app only really broke time down by description and category - although thinking about that now. I guess I could make each project a category. Hmmm, something to ponder.

~Final Comment~
I'm fairly pleased with this make. I did rush it a bit because of the looming deadline and running out of time because we are going away, but I think this will be a good dress for 'everyday' wear. I have to go back and reinsert the zipper again I think….maybe  ;)
Spoiler: I didn't reinsert the zipper :P

You can pop over to the post I did on The Monthly Stitch to see some more (unfinished dress) pics :)


Question Time:
Do you follow instructions when you make something?
What are some the 'standard' things you change when you make something?
Do you ever go back and 'fix' things when you make something? I rarely do.
What are your tips for inserting sleeves?


Until next time,


Let's connect