Showing posts with label Skirt. Show all posts

Thursday, 4 December 2014

::Sewing::Self-Drafted Polly Pencil Skirt


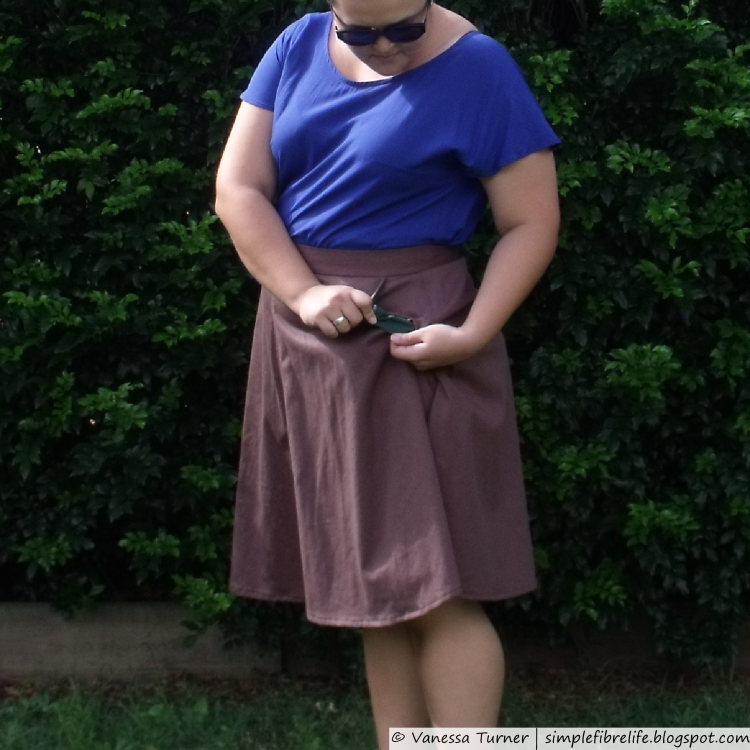
Here is the first wearable garment I made using my pattern block and the patternmaking skills I honed during the patternmaking course I wrote about in my last post.

I'm calling it my Polly Pencil skirt, as in Polly Pocket Pencil Skirt :)

I wanted to wear this skirt to the last pattern drafting lesson I took. I also wanted to wear this skirt on a trip I was taking to visit my parents too. So that pressure was on! But that didn't stop me from making the final skirt the day before my last patternmaking lesson :)

I had all the supplies in my stash so I power-sewed the heck out of this skirt and I'm so pleased with it.

~Inspiration~
[source]

This skirt is one of the inspiration pictures I took into the patternmaking course. I thought it would be interesting to see the process to make the pattern from a basic pattern block. In class the teacher drafted the pattern, but omitted the pocket bands. I thought that the pockets bands where the best part so when I drafted the pattern I made sure to include them. The main thing that drew me to this skirt was the pockets and how they were constructed.

~Pattern~
Self drafted using my 1 dart skirt block from taking the patternmaking course.

~Pattern Adjustments~
I started by using my 1 dart skirt block. I decided that I wanted the skirt to be about knee length so I traced off a centre front panel and then a side panel from waist to knee. The centre front panel was set aside and I moved on to the side panels.

I drew in the style lines on my tracing of the side panel. I drew an outline for the pocket band, and the pocket lining. This became my working pattern and I used it to trace off the pattern pieces I needed to sew the skirt.


Then I marked notches and grain lines. I decided that I wanted to cut the pocket bands so they ran along the straight grain so they wouldn't stretch out over time. Once that was all done it came time for the toile. I was pretty happy with the toile and didn't make any changes.

~Materials~
  • Slate coloured cotton drill fabric - most likely from spotlight.
  • Black cotton lawn
  • Zipper
  • Interfacing
  • Thread
~Construction~

Skirt Front
Sewed each of the pocket panels together.
Attached to centre front panel.
Attached to waistband.


Skirt Back
Sewed darts in skirt back.
Attached to back waistband pieces
Inserted centre back zipper


Assembly
Sewed up side seams and adjusted sided seams for better fit
Folded over waistband and secured by stitching in the ditch from the front

Hemmed the bottom of the skirt

~Changes I made this time~
  • As I was sewing I realised that I wanted the skirt to be a little shorter so I ended up sewing a wide hem, but I'm glad I did because it adds some heft and weight to the bottom of the skirt.
  • I took a little of extra time while making this skirt and top-stitched along the long edges of the pocket bands and along the seam joining the front side panels to the centre front panel. I also top-stitched along the bottom edge of the waistband.

~What I Like~
  • the fabric is great because it breathes and has been wearing really nicely into a softer fabric.
  • The pockets! They are so useful and are really great to stash my phone wallet and keys when I need to quickly duck into the store.
  • I really like the centred zipper I put into the skirt, it's help up really well and conceals the zip
  • I really like the way the top stitching I did on the skirt give is a more 'polished' look. 
  • I'm really glad I did a zig zag tack across the bottom of the zipper. I usually wear  out the fabric here and it's held up well with wear.

~What I Don't Like~
  • The waistband rolls a little
  • The pocket bands get droopy sometimes

~Changes for Next Time~
  • The waistband rolls, so next time try a narrow waistband like this
  • I would interface the pocket bands next time because they have started to warp a bit over time
  • The top of the pocket bands curl into the pocket if I have something a little heavy in my pocket so to stop that I would stitch in the ditch of the lower pocket band seam and catch the lining

~Numbers~
PatternFree - Self Drafted (time accounted for below)$0.00
Fabric1.5m slate coloured cotton drill - $8.99/m~$13.50
Notions
  • Black Thread - stash
  • Interfacing - stash
  • Black Zipper - stash
$0.00
$0.00
~$2.00
TimeI forgot to record time for this project so I'm guestimating here
12.75 hours (* $17-ish Australian minimum wage)

fabric prep - 15 minutes
patterndrafting - 3 hours
sewing toile - 2 hours
cutting -  30 minutes
sewing final garment - 7 hours
$216.75
Total
$232.25

I was going to list the fabric as from stash because I couldn't find a price after a quick flip through my fabric stash record, but then I caved and had a proper look through my craft receipts.

Sidenote
I have a habit of keeping the reciepts from my crafty purchases in a folder where I keep other crafty paperwork I want to keep. It comes in handy when I'm costing out my projects. I have them in date reverse order and and the end of each year staple together the years reciepts. I've only been doing it for 3 years, but I like the idea that I can go back and see how much I paid for various supplies. OCD much :)


~Final Comment~
Awesome Skirt Fist Pump!
I'm so pleased with this skirt. It has been on very high rotation in my wardrobe ever since I made it.
I wear it at least once a week if not more. It's so comfortable and I'm really pleased with the fit. I keep meaning to cut out another and make the changes I've mentioned above. This is definitely a win in my books.

Do you have a self-made garment that you wear all the time. Are you pocket obsessed? Do you keep receipts from your crafty shopping? Did you ever play with Polly Pockets as a child (or now, no judgement here)?
Tell me in the comments, I love reading what you have to say :)


Until next time,

Let's connect online :)
Instagram Icon Facebook Icon Pinterest Icon Twitter Icon

Thursday, 24 April 2014

::Sewing::FO:: That 70's Hollyburn

Ever since I made my first Hollyburn skirt I've been meaning to make another.


I couldn't for the life of me find the pattern pieces I'd traced and adjusted from last time. I can't remember which view I cut out last time (I checked the post and I didn't mention it. Gah!)
I traced view B pattern and then put it aside as I made this dress. I finally cut out the fabric for this skirt the other day when I was cutting my rayon kimo-no top.

I found that in the last skirt the pockets where a tad bulky so I thought I'd try to make the lining out of some quilting cotton I had in my stash. I drew a 5/8 inch seam allowance either side of the fold line. I folded the pattern at the appropriate SA line and cut out the pocket lining from the quilting cotton and the pocket from the main fabric. I could have done a pocket facing (when the pocket bag is made of a lining fabric, but the bit showing is a small section of fashion fabric), but I'm not that big a fan of them. Mine usually slip out so you can see the pocket facing edge from the outside.

I folded the pattern at the appropriate SA line and cut out the pocket lining from the quilting cotton and the pocket from the main fabric. While I was faffing about with the pockets I got rid of the point in the bottom of the pocket bag by tracing around a container lid and snipping it off.

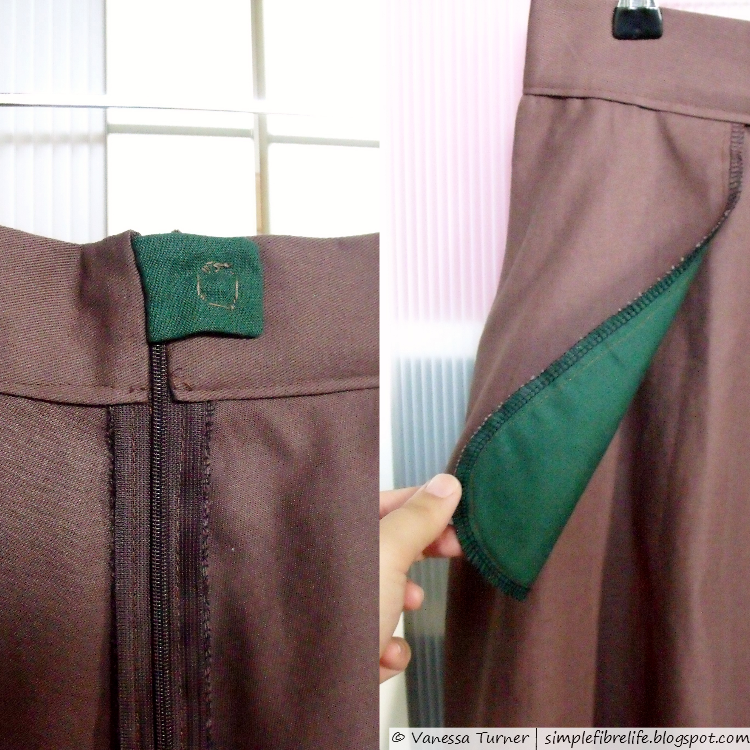
This is my trying to show you the green pocket facing.
I took my time with this make and added some details to mix it up. I top stitched around the pockets edges. I sewed, overlocked (serged) and top stitched the front and side seams. To top stitch the seams I used my stitch in the ditch foot and moved the needle to the side.


As an experiment I used heavyweight interfacing on half the waistband. I finished the waistband by stitching in the ditch between the waistband and skirt.

I sewed in snap tab at the top of the zipper to hold the skirt up as I zip up. I came across this idea in the Pants Construction Techniques Craftsy class with Sandra Betzina.


Inspired by this post I trimmed and finished the invisible zipper by sewing pouch the width of the zipper, folding all the raw edges to the inside, slipping the trimmed zipper in the pouch and sewing across the top.

To hem I sewed a line of basting at 1 inch. I then pressed the hem up at this line. To finish I turned raw edges into the crease of the fold.

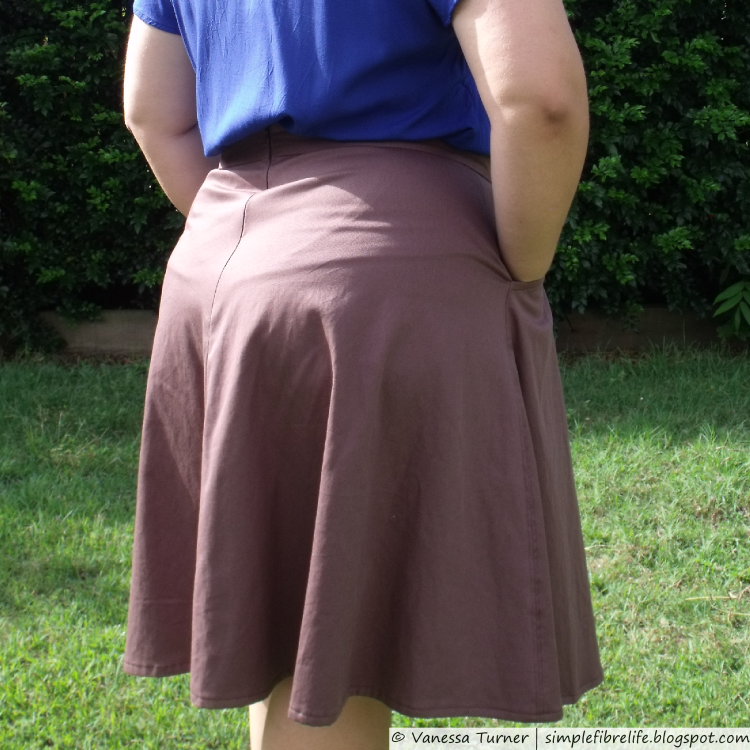
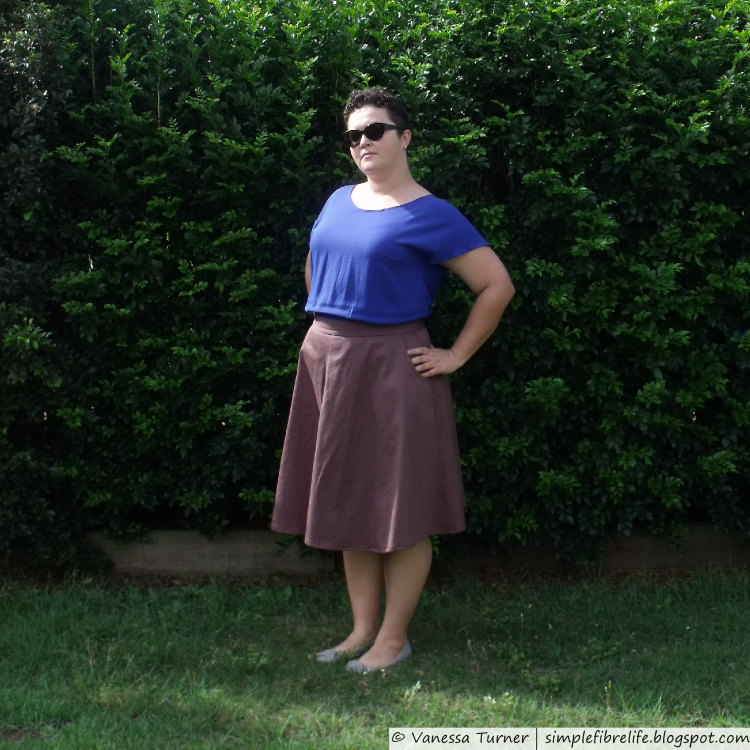
I'm happy with the fit of this skirt. It is very different to the fit of the first Hollyburn I made. The waistband is snugger than I'm used to and sits at my waist, but that was what I was going for. The skirt fabric bunches and pulls a tad above my bum, which means I either need to do a sway back or a full butt adjustment - I'm leaning towards a full butt adjustment.


~Pattern~
Sewaholic Hollyburn-View B

~Changes I made this time~
  • Changed the pockets - made it a 2 piece pocket and rounded the pointed bottom
  • Snap tab at top of zipper
  • Invisible zipper
~What I Like~
  • The snap tab is fantastic! Makes zipping up a breeze!
  • The colour is a great basic without being black.
~What I Don't Like~
  • The fabric is a bit rough. But I'll see how it goes after a few cycles through the wash.
  • The zipper gets a bit stuck at the waistband. I think it's a  combination of a bulky waistband and slightly over exuberant stitching at the zipper while finishing the waistband  are the culprits.
  • There is a bit of pulling in the back of the skirt when I put my hands in my pockets
~Changes for Next Time~
  • I might try a full butt adjustment to resolve some of the bunching at the back of the skirt.
  • I have sewn the Hollyburn a couple of times in fairly heavy fabric. I'll have to try it in a lighter fabric.

STATS
PatternSewaholic Hollyburn (view b) - used before - FREE$0.00
Fabric3.0 m brown cotton canvas (can't remember how much it cost, it's pre-blog)$15.00 ish
Notions
  • Thread
  • Snap
  • Interfacing
$3.50
$0.50
$0.50
Time8 hours (* $16-ish Australian minimum wage) $128.00
Total
$147.50

~Final Comment~
I think that the skirt has a very 70's vibe. I think it's a combination of the shape, length and colour. Overall a pretty good make. It will make a great addition to my wardrobe rotation.


So tell me, have you been meaning to make another of something you've made before? If so, what is it? Leave a comment below :)

Until next time,


Lets connect

Friday, 27 September 2013

::Sewing:: Olive Drndle Skirt


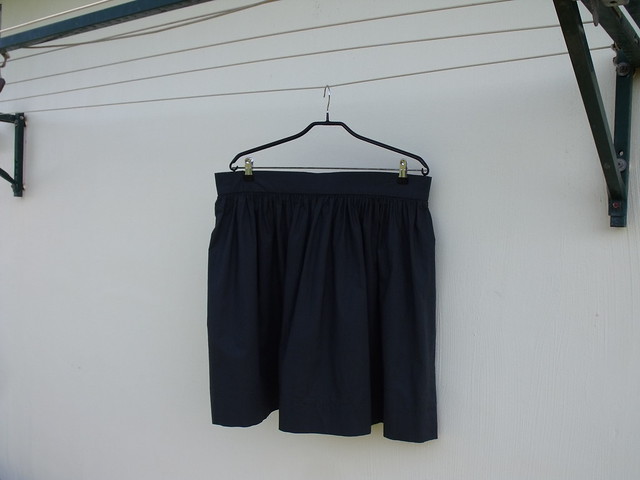
Ever since I started sewing again a couple of years back I've wanted to make a Drndle skirt. I finally got around to doing it recently.
I bought this olive green broadcloth aaages ago. I didn't have any specific plans for it, but it was one of the colours from my colour palette after my analysis.

The basic steps of construction were as follows:
Cut fabric
Interface the front half of the waistband
Baste 3 rows if gathering thread at top of skirt pieces
Gather the skirt pieces
Stitch cotton tape to back of gathering
Insert invisible zipper
Overlock waistband edges
Create little tag
Attach waist band front
Stitch each waistband tab
Stitch on the ditch between skirt and waistband (catching back of waistband at the same time)
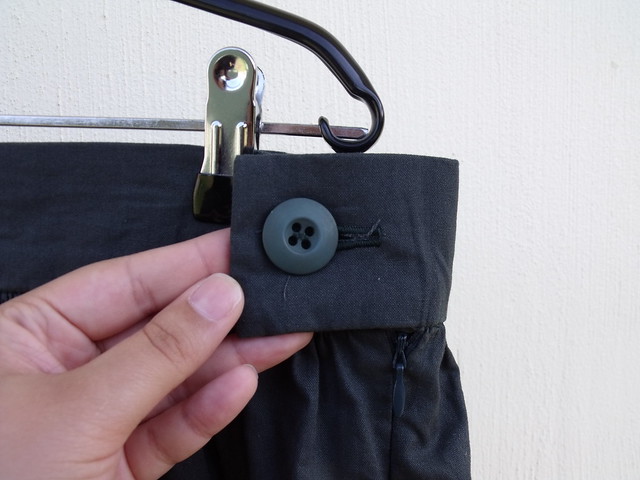
Sew button hole
Attach button
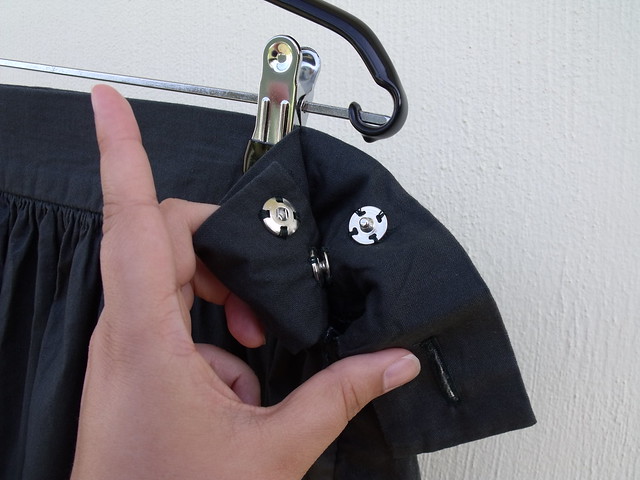
Attach snaps
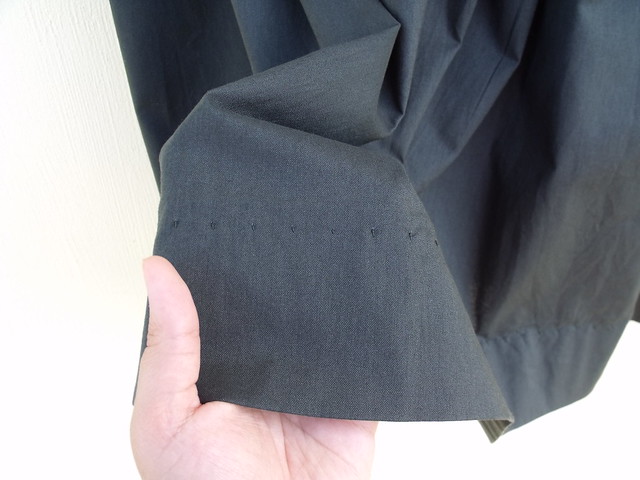
Hem with blind hem stitch

I created a little loop to act as a tag of sorts as I like having a quick reference to know how I should be wearing my clothes.


I attached the snaps to make it waist to put the skirt on as the snaps are quick and simple to attach the skirt before buttoning  and zipping.


I have recently been trying to avoid shopping for creative supplies as I tend to buy a lot of "necessary" extra items.  I'm frying to stash bust and bring some of my sewing plans to fruition.  So the button I used came from a button value pack.


I used the blind hem stitch on my sewing machine.  The stitches pull, probably because its a double tum hem. I can handle it, considering I was in a hurry to finish it.


I was jumping on a plane to go on a holiday the next day.

l specially ironed for photos because being cotton she wrinkles like  a bloody prune!

Tell me about a time when you completed a project you've been meaning to do for ages.

Until next time, I hope you are bringing some of your creative plans to fruition.
 V xoxo