Thursday 30 October 2014

::Sewing::FO:: Special Dress for a Special Day


~Inspiration~
This dress is the climax to my year of sewing dresses for weddings. I was asked to be a bridesmaid by one of my closest friends early this year. Her only request, clothing-wise, was her bridesmaids wear black all the other details were up the bridesmaids. What an awesome bride!

I wasn’t 100% sure of what I wanted to wear. I just knew that I wanted to make my dress because then it would fit just the way I wanted and so I could be comfortable on the day and enjoy myself. I really like the bodice shape of the peony dress I made but I wanted a better fit through the shoulders and a slightly narrower neckline. So I thought I’d try drafting a bodice with a wide neckline using the blocks I made in pattern drafting class (yet to be blogged about).

In my usual fashion, I didn’t get started on my final dress until pretty late. I even bought a backup dress just in case I didn’t finish my me-made dress. I finished my me-made dress way ahead of time (ahem less than 24 hours) and even added a few handy details too.

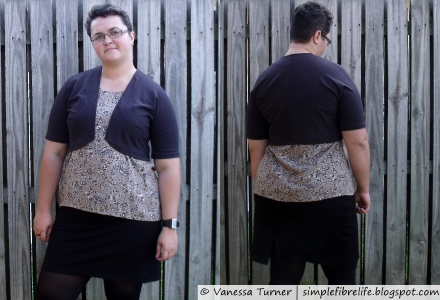
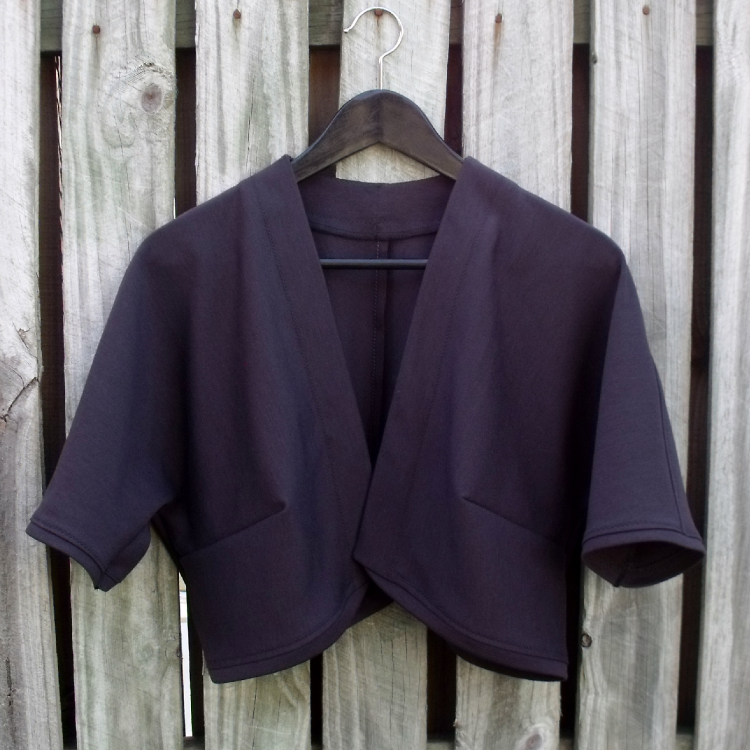
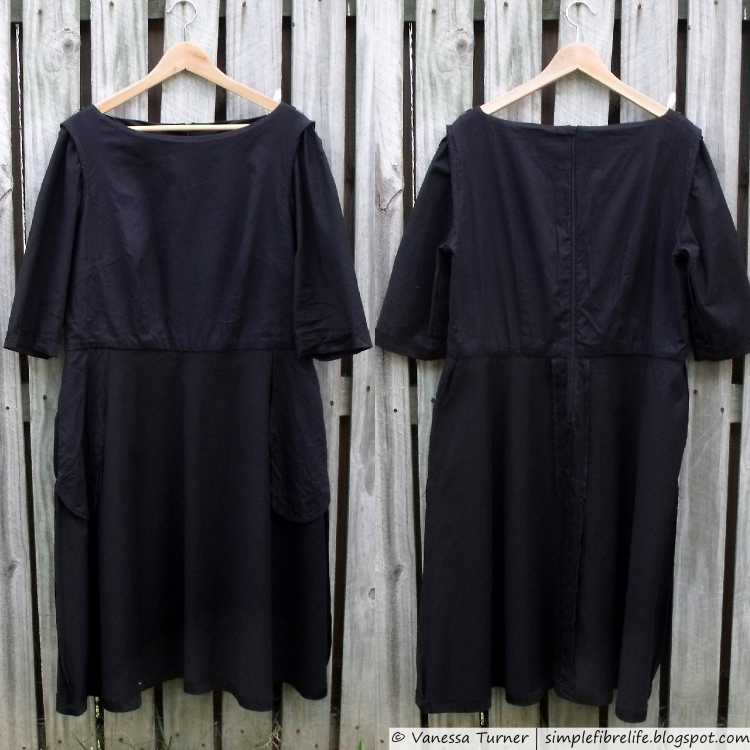
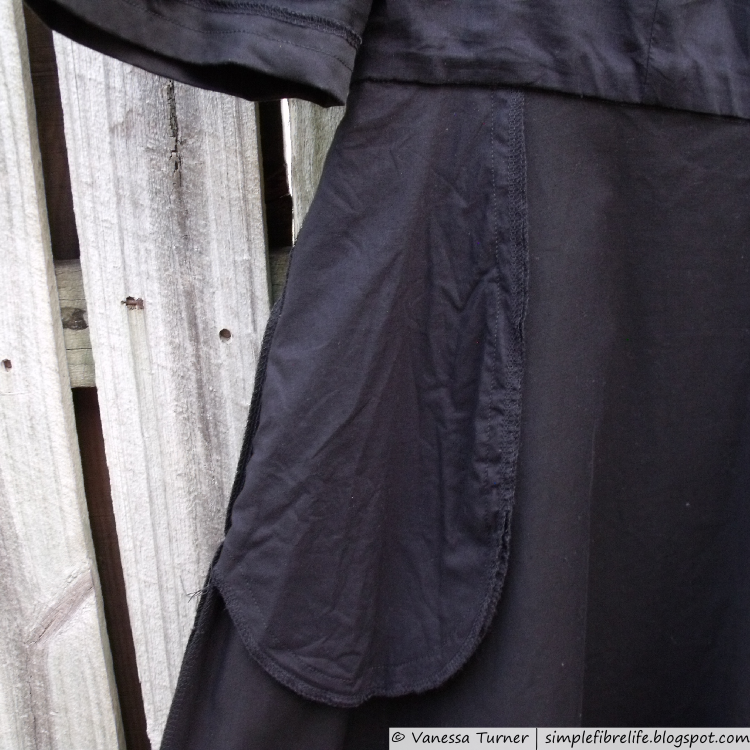
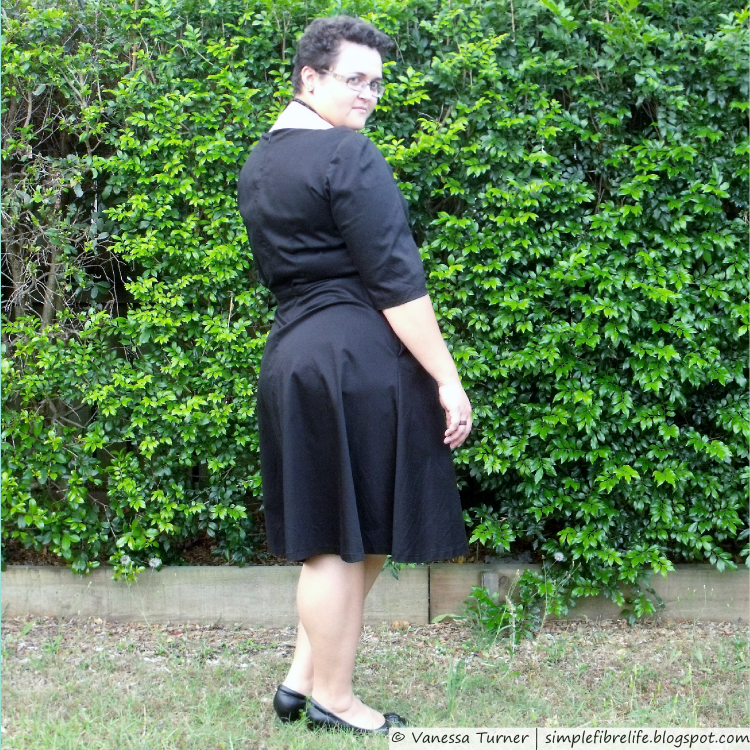
This dress has a bateau neckline, front waist and side bust darts and waist darts in the back. The bodice is the only part that is lined and the flared skirt has side seam pockets. Love me some pocket action! They were really useful on the day; somewhere to store written down ceremony readings and bridesmaid speeches :)

Didn’t need the backup dress in end, I’m glad too, coz that thing does not have pockets ;)


~Materials~
The fashion fabric is black stretch cotton sateen from Spotlight. I have other dresses made of the same fabric and I like the hand and drape of the fabric so I thought it would be ideal for a dress for a special occasion. The dress needed to be comfortable and breathable so I used a black cotton lawn to line the bodice and make the pockets, also from Spotlight.
I also used a 20” (51cm) black invisible zipper, some black snaps and of course some black thread :) – probably all from Spotlight

~Pattern~
Pattern & View
Self-drafted pattern using my block as a base – made in my size :)

Were the instructions easy to follow?
They sure were. I made them up myself and just followed the basic construction of a dress with a lined bodice

How was the pattern fit?
Using a block drafted to my measurements made it very simple to make this dress. However, I did have some large seam allowances when I cut the fashion fabric just in case I hit any snags while I was making it. You just never know how fabric is going to change the way a garment fits.

Would you recommend it?
I would totally recommend people making block patterns. Even if it was just to check the way commercial patterns are going to fit.

Would you make it again?
This patter is going to get used again. However, I think I’ll use a nice print to make a more casual dress :)


~Pattern Adjustments~
I started to write about the whole process I went through to make this dress and it was turning into an epic tale. So for this post I’ll just do a quick run of the style changes I made to my bodice block.

I widened the neckline, but made sure that my bra straps wouldn’t peek out.
I removed the back bodice shoulder dart.
The sleeves on my block were shortened to about elbow length.
A flared skirt was drafted from my 2 dart skirt block.

I’d like to record the whole process of making this dress; so I think I’m going to have to do another behind the seams post like I did for my S2444 - here and here.
More details to come :)

~Construction~
I made quite a few toiles in the two weeks leading up to the wedding. The final construction was very straight forward after all those toiles. I just followed the usual steps someone takes for sewing a dress with a lined bodice. Although I was a little cheeky and cut the back skirt pieces, bodice fashion fabric and lining fabric so the seam allowance was on the selvage, so need to finish those seam allowances.

Like the pattern adjustments, I’ll do a quick list of the construction steps in a behind the seams post.


~Changes I made this time~
  • As this was the first time I’ve made this dress pretty the whole dress was a change :P
~What I Like~
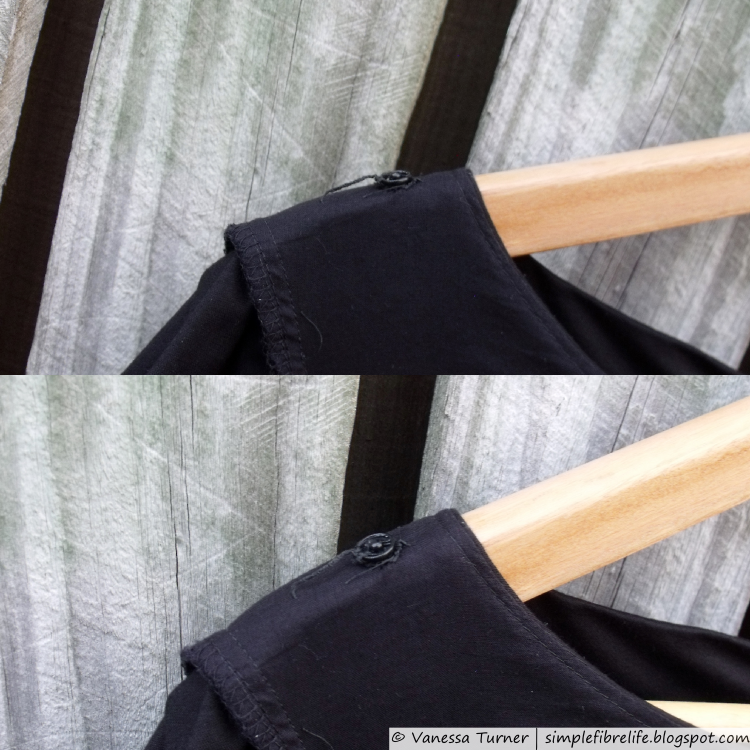
  • My absolute most favourite part of this dress are the bra strap carriers I sewed into the lining shoulder seams. I didn’t have to fiddle with my bra once! So great! (I used this method, it seemed the simplest and didn’t need any special equipment.)
  • The fabric is great, it looks good
  • Snap tab at the top of the zipper makes it easier for me to zip up on my own. Great alternative if you find sewing in hooks and loops too fiddly.

~What I Don't Like~
  • The pockets aren’t quite deep enough so things can fall out when I sit down. 
  • The zipper I used was a bit too short so there isn’t enough room for my caboose when stepping into the dress. I get into the dress from underneath.
  • There’s just a titch more ease in the waist than necessary. 
  • The fabric is definitely a fluff magnet, but I guess that’s one of the drawbacks of using dark a solid colour. Oh well, such is life. 

~Changes for Next Time~
  • Redraft the pockets so there are little deeper by raising the bottom of the pocket opening.
  • Use a longer zip
  • Nip the waist in little bit. Next time I might try constructing the garment with fronts and backs attached only at the shoulder and then sew up the side seam to adjust fit.
  • Perhaps make it in a patterned cotton sateen
~Numbers~
There was a lot of tweaking on this dress because of all the style changes that were made and had to be tested. So that time does add up…


PatternNA - Self Drafted-
Fabricblack cotton sateen $12.99 x 2.5m
black cotton lawn x 1m-ish – from stash
$32.48
-
Notions
  • Thread - 1000m – added to stash
  • 51cm (20”) Zip
  • Snaps – from stash
$15.99
$4.99
-
TimeTotal 30.5 hours (x $17-ish Australian min wage)
0.5 hours - fabric prep
5 hours - pattern adjustments
12.5 hours - sewing muslin
2 hours - cutting final garment
10.5 hours - sewing final garment
$518.50
Total
$571.96

That’s pretty expensive, but when you think about it. It’s a bespoke dress for a special occasion and really people have been known to spend HEAPS more. A lot of that time was spent perfecting the fit and the style changes so that time does add up; especially because I’m not a speed demon, I like to take my time :)

The eagle-eyed among you may note that I’ve changed the minimum wage from $16 to $17 that’s because the actual minimum wage is $16.87, so really I was cheating myself out of nearly a dollar an hour. We gotta give our time proper value, it’s finite.

~Final Comment~
I’m very pleased with the dress I made. The final result was a very plain black dress. Something I can dress up or down (mostly up). It got heaps of complements on the day and it was very comfortable on the day. I think this pattern draft is a keeper; I might even make a digital copy for keeps, maybe.


Have you made something special recently? What’s your favourite fancy fabric to use? How do you avoid bra straps peeking out? Leave a comment below, I'd love to hear from you :)

Until next time,


Let's connect

Tuesday 28 October 2014

::Milestone:: I've been featured on PatternReview.com

So yeah.
I've been featured on PatternReview.com.

"Hi!" to anyone who has clicked over from over there.
"Welcome to my little piece of the internet. 
Take a look around. :)"


I'm a little bit excited.
Ok.
I'm very excited :)

So I was minding my own business today when I got an email.


I thought,
"No. That can't be right"
So I clicked over to the site.
And sure enough there I was.


Oh you can't see me?
Here..


Ok wait.
Let me zoom in.
Here!


So, what do ya know.
I've now been a featured member on PatternReview.

Do you get excited when your featured, or get a compliment or get told you've done a good job?
How do you take it? Let me know in the comments below. 
I'm terrible at accepting compliments graciously. 
But I'm slowly learning. Very slowly :)

Until next time,


Let's connect

Thursday 9 October 2014

::Sewing:: A Dusting of Cocoa


~Inspiration~
How this garment came to be is a bit of an epic tale.
Started with the monthly stitch announcing indie pattern month
Not long after I went to Voodoo Rabbit Fabrics while I was over that side of town
Didn't really want to buy anything but caved when I saw the cake patterns
My justification was that these would be the 'New to Me' patterns for Indie Pattern Month over on The Monthly Stitch.
Aaanyway, I didn't get around to making it for Indie Pattern Month.
Then there was Let Them Sew Cake Month, aaand I didn't sew it then either.
But then finally there was Amnesty Month over on The Monthly Stitch and I finally gave myself a kick up the arse and just finished it.
Third time is a charm?

Here is my post over on The Monthly Stitch - Amnesty Month: Dusting of Cocoa


~Pattern~
Cake Patterns Cocoa Shrug Riff
from Voodoo Rabbit Fabric at end of May 2014
Cut Size 40 D

Being a riff pattern the instructions weren't as detailed as would be ideal.
But I was aware of that before I started as I've been following StephC for a long time and understood the concept behind her Riff patterns.

~Pattern Adjustments~
Traced off the pattern and didn't make any adjustments to pattern before I sewed.


~Construction~
  • Cut a size 40 D
  • Followed instructions, but didn't stabilise shoulder seams (laziness and wanting to get started won over)
  • Basted side seams and it was way to big
  • Flipped it inside out and pinned out the excess
  • Increased height of dart by 7cm (2.75") (didn't change intake)
  • Finangled side seams - traced a new side seam sewing line, basted it, tried it on, repeat, repeat, repeat...
  • Ended up taking 2.5cm (1") at sleeve; 6.5cm (2.5") at side seam curve and nothing at waist
Random side note: These days I jump between metric and imperial when measuring things. I have always used the metric system as I grew up so I find this shift odd. I guess it's because of being exposed to imperial measurements all the time when sewing.
Am I alone in doing that?

  • probably took a bit too much out of the side seam.
  • Top stitch neck facing down because it pulled strangely because took too much out of side seams - should have waited to the end because the facing is used to enclose the waist binding.
  • Raised the waistline at the back and sides by 1.5".
  • Basted binding to this newly chalked line to assess fit.
  • Unpicked binding at front.
  • Raise hemline 1.5" at front too - baste tested it
  • Trimmed hemline, unpicked waistband and unpicked neckline facing from shoulder seem to front waist - so I can finish waistband nicely.
  • Sewed waistband to bottom - ends enclosed in neckline facing.
  • Top stitched neckline facing down.


~Materials~
  • Ponte knit left over after my Lady Skater Dress - from Spotlight. I think all I have left now is scraps.
  • Interfacing - was probably a bit too heavy for this make.

~Changes I made this time~
  • I adjusted the bust darts and side seams to get a better fit.
  • I topstitched the neckline facing down once I had attached the hem band. I just preferred it to be fixed, although it does create some subtle drag lines.

~What I Like~
  • I really like the style.
  • I like how the hem band is finished at the front opening.
  •  I like the sleeve length on this version, however, I have a feeling that if I had picked the correct size they would have been much shorter. Something to remember when I make another version.

~What I Don't Like~
  • The back is a little too small after taking in the side seams
  • The sleeve hems are a little distorted after taking in the side seams
  • I don't like the way the sleeve hem bands are inserted before sewing the side seams, although if I were using a lighter knit it would probably be less of an issue.


~Changes for Next Time~
  • I'd like to start over again for next time. Pick a different size as a starting point.
  • However, making sure the sleeves are a similar length to this make would be good too.
  • Use a cooler fabric, perhaps some merino that I keep reading about on the blogosphere.


~Numbers~
Pattern Cake Patterns Riff Cocoa Knit Shrug (from Voodoo Rabbit Fabric) $10.00
FabricPonte knit left over from Lady Skater DressFREE
Notions
  • Interfacing - In Stash
  • Thread - In Stash
FREE
Time12.45 hours (* $16-ish Australian minimum wage)
Tracing the Pattern-1hr 30min
Fabric Prep-10min
Fabric Cutting-1hr 20min
Sewing-5hr 30min
Fitting-3hr 15min
Unpicking-1hr
$204.00
Total
$214.00

Wowee! That is a lot for a little shrug like this.
However, when looking at the numbers a lot of that time was taken correcting the error of cutting out the wrong size to begin with.


~Final Comment~
Considering that I started with a shrug that fit terribly (due to my own mistake), I've ended up with a garment that will probably be a bit of staple.

I big lesson I learnt is that fitting a pattern really is a to-and-fro process.
I don't think that I've basted and unpicked this much ever before.
Another lesson was that I should really take body measurements and compare them to the pattern pieces, especially when working with a new to me pattern company.

The fitting issues I had are my own fault. There was some instructions in the pattern along the lines of the cup sizes on the patterns are not necessarily aligned with bra cup sizes, but I ignored that - to my own peril!

I'm just glad I was able to save this make.

I cut out a Tiramisu dress at the same time in the as when I cut this cocoa out, in the same size (40 D). Doh!
So, before I start sewing that up I'll have to compare the pattern to some of my body measurements and the measurements of the pattern pieces. I'm thinking that I'll compare my measurements and compare them to the pattern. I'd say a good place to start would be back length, front length and bust related measurements like side to bust and shoulder to bust. Yeah, well that's the plan anyway.

What measurement system do you work in when your sewing?
Have you rescued an epic fail project? Or do you through yours into an ominous 'wadder' pile?

Leave a comment below, I'd love to hear from you :)

Until next time,


Let's connect