Friday 28 February 2014

::Book Nook:: The Complete Book of Sewing

I've got a lot of sewing books in my collection. I probably don't use them enough, but they are really great for times when I get stuck.

When I'm looking to buy a new sewing reference book I usually turn to the internet and probably the blogasphere first and foremost. I find it really helpful when sewists review books and it's even better when they provide pictures of the best bits of the book. I've definitely been swayed by a great book review blog post to buy a book to two.

I'm kicking off with The Complete Book of Sewing by Alison Smith*. It's the first sewing book that I ever bought. I've neglected this book for awhile, but as I was going through the book to write this post I rediscovered how great it was.
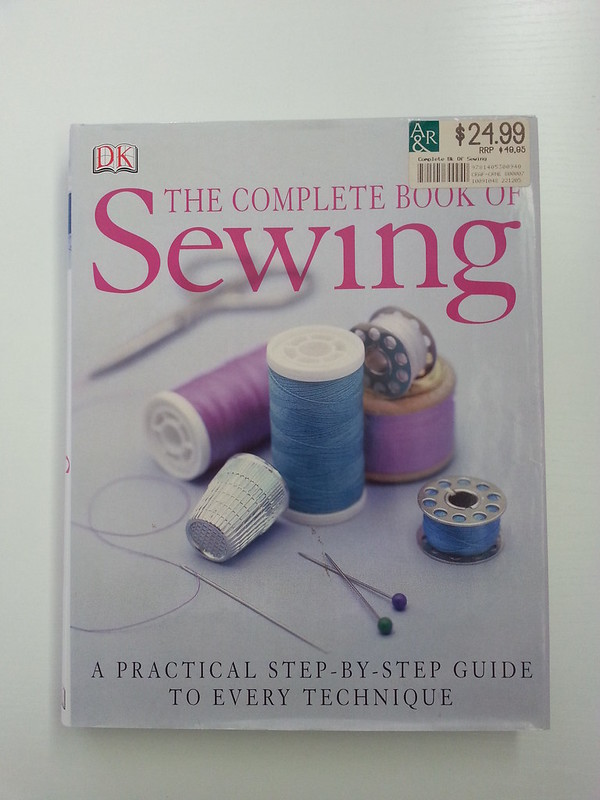
Book Cover
The table of contents gives you a peek into the sections of the book...
Table of Contents
...but the real gems for an insight into the content of each section are the 'section opener' pages with a comprehensive list of what is to be found in each section.

Section contents
I had forgotten how comprehensive this book was and have earmarked a few pages for quick reference (I'm not a 'dog ear'er, I prefer to use mini post-its with a scribble with the page peeking out the top.)
The machine feet directory is fantastic to remind me of the machine feet available to use for different purposes.
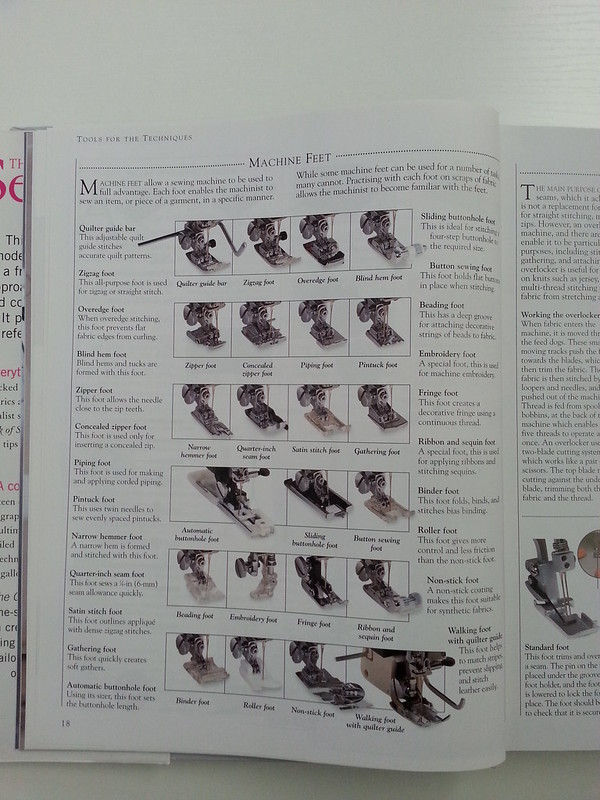
Machine Feet Directory
There is a really great section dedicated to the comparison of body measurements and where they are on sewing patterns. Really great visual reference for those interested in getting a better fit on their garments.
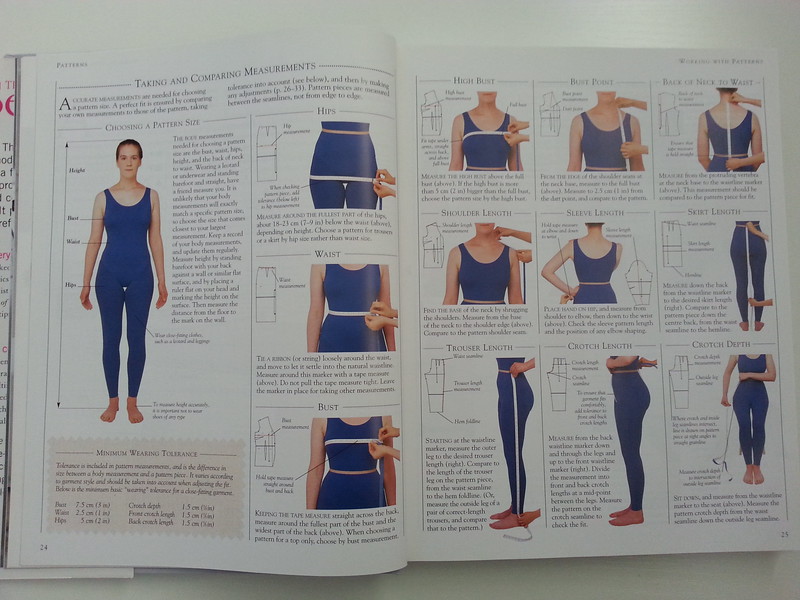
Body Measurement and Pattern comparisons
Here is a close up of the bust point measurement and pattern comparison. The book then goes into how to make flat pattern adjustments.
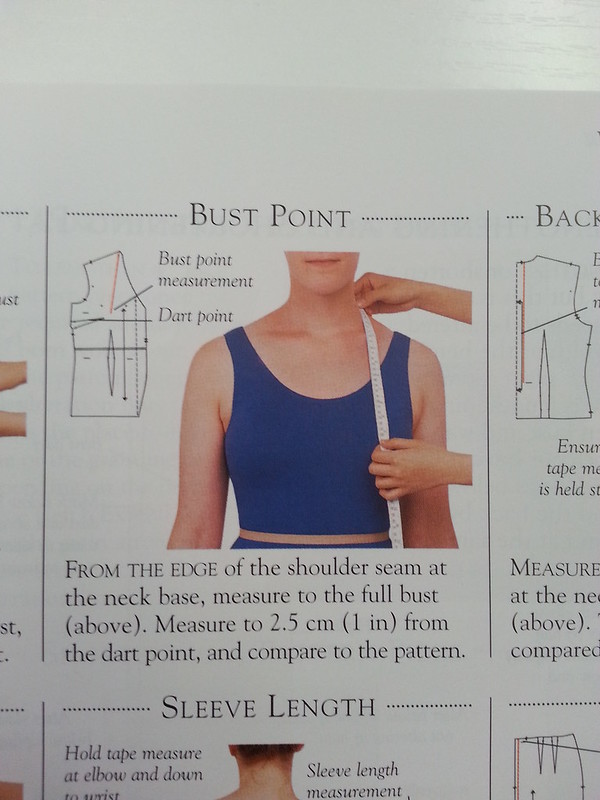
Bust Point Measurement and Pattern comparisons
The section on fabrics is good, but not comprehensive. It is still a good reference for common fabrics and what they are commonly used for.
Fabric Descriptions
One of the gems of the fabric section is this Fabric Care table. A good starting point when looking into how to care for particular fabrics with a few great tips.
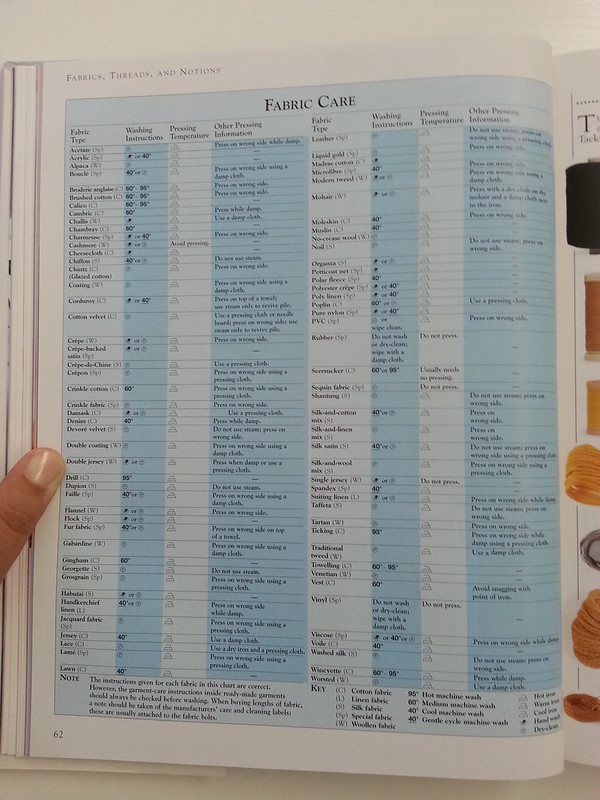
Fabric Care Table

Instructions for techniques are clearly described and there are colour photos to help understand what to do.
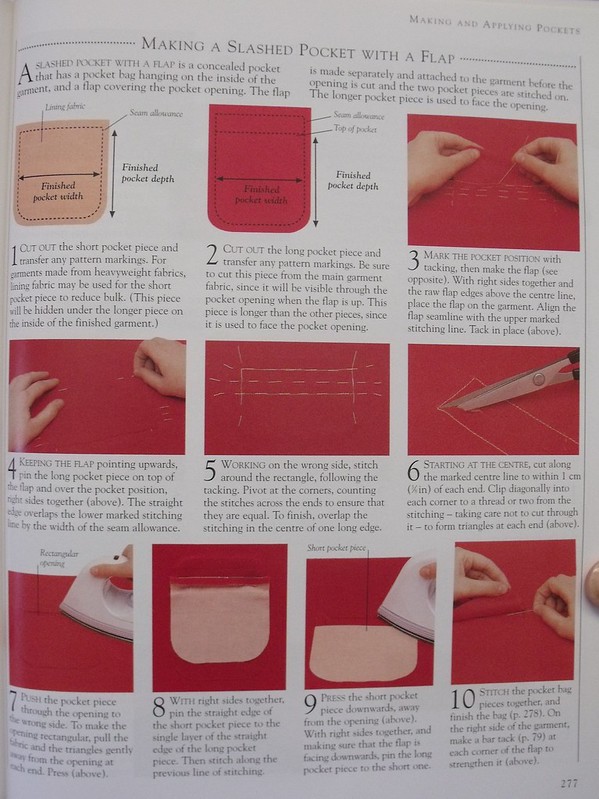
Instructions for a slashed pocket with a flap.

Peppered throughout the book are these 'Tip boxes'. This is a great one about seam guides. I really like the tip about a Corner guide there on the far right.
Seam Guide Tip Box
Where relevant in each section of the book there is a directory of various styles and types of what is being covered in that section. For example, there is a directory of the types of darts outlined in the 'Forming Darts' section. I find the directories inspiring and if you're a more advanced sewing it might give you ideas for how to change a TNT pattern.
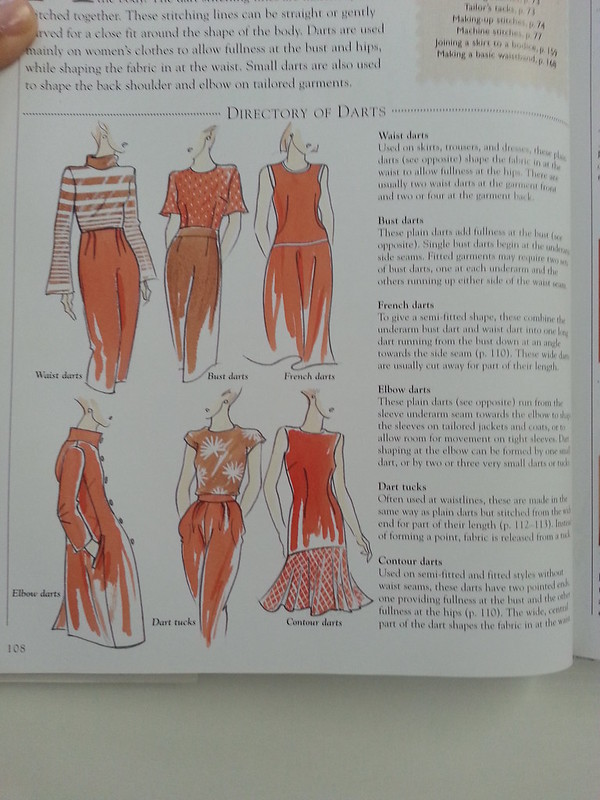
Directory of Darts
The book does have a section on 'Professional Techniques' which goes over some tailoring and dressmaking techniques. This would be a great source of information for a sewist who is wanting to explore this area of sewing.
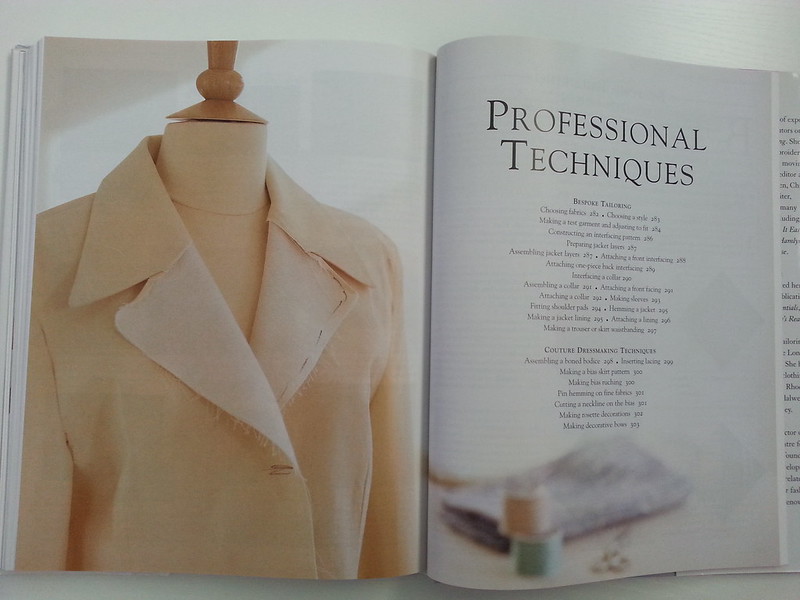
Professional Techniques Section
I really like the glossary as well. It would come in very handy to a sewing newbie who wanted to look up sewing terms they weren't familiar with. There is also a comprehensive index at the back of the book for quick reference.
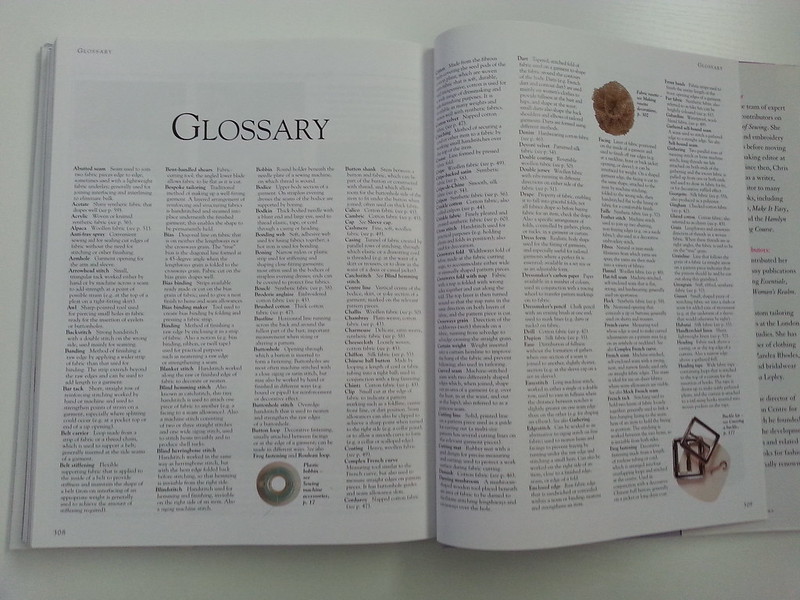
Glossary
Overall I think this is a fantastic general reference book for sewists of all levels. There are comprehensive instructions and pictures throughout the book. For the new sewist it is a fantastic guide and for the experienced sewist it is a great reference and source of inspiration for new 'professional' techniques to learn.

The Complete Book of Sewing* is available on Book Depository (free worldwide shipping).

Do you have this book? Do you like it?
Do you dog-ear your books or is that a big no-no?
Leave a comment below, I'd love to hear from you :)


Until next time,


*Affiliate Link. I bought this book using my own money or with gift certificates from friends or family. All opinions are my own. More information regarding affiliate links in this post.

The photos used in this post were taken by me of the book 'The Complete Book of Sewing' by Alison Smith. All images remain the property of their original owners.

Lets connect

Tuesday 25 February 2014

::Sewing:: Navy S2444 - Behind the Seams Part 1

I showed my Navy S2444, but I didn't tell you about the journey from pattern to a finished dress. I thought it would be interesting for people who don't sew much.

There was a lot involved in the making of this dress. I want to make some notes about the process mainly for my own reference, but if other people get some value out of it that's awesome!

I'm going to have to break this up into a few posts, because there is just so much involved. I'm not going to go over every step in detail, but there are some things I will expand on.

Simplicity 2444 Construction Steps
This is a quick and dirty list of steps I took to make S2444
  1. Traced size 20 to paper
  2. Transferred seam lines on toile using a tracing will and wax paper
  3. Sewed toile; inserted a zipper in the centre back of the muslin with the stopper at the neck 
  4. Increased bottom of bodice side seam at waist by 1 inch on both front and back
  5. FBA - 3/4 inch increase adjustment for a D cup (as per The Complete Photo Guide to Perfect Fitting, p130). I was completely baffled by how to do this over 2 darts. Google searches came up with nothing.
  6. Rotated side waist seam increase from FBA to waist dart closer to the front
  7. Raised both dart apexes 1 inch.
  8. Split dart uptake between the two darts (both darts are now 2.5 inches) 
  9. Added 1 inch to side of skirt patterns
  10. Adjusted pocket pattern piece so they attached at the waist
  11. Wrote a quick construction checklist
  12. Cut dress fabric
  13. Cut bodice lining fabric
  14. Staystitched bodice necklines - outter and lining, front and back
  15. Sewed outter and lining bodices at shoulder seams, pressed, finished seams
  16. Sewed bodice to lining at neckline, pressed, clipped and finished seams
  17. Sewed bodice to lining at armholes, pressed, clipped and finished seams
  18. Turned the bodice right side out - had to pull the back pieces to the front through the shoulder channel
  19. Sewed the bodice side seams - 1 continuous seam for outter and lining
  20. Sewed skirt centre front seam, pressed and finished seams
  21. Basted front and back skirt pleats (the centre front pleats where a nightmare!)
  22. Basted pleats at the skirt waist seam
  23. Sewed pockets to skirt front and backs side seams, pressed, finished seams
  24. Sewed the skirt front and back together at side seams (going around pockets), pressed, finished seams
  25. Basted pocket tops to skirt waist seam
  26. Attached bodice outter to skirt waist, pressed, finished seams
  27. Basted the back seam where the zipper would go, sewed the lower seam
  28. Hand basted the zipper in place
  29. Machine sewed the zipper
  30. Hand sewed the bodice lining to the waist seam and zipper tape
  31. Finished the hem edges (or tried to before my overlocker tried to eat the fabric)
  32. Hemmed the dress

I used some of the techniques from The Couture Dress Craftsy class to make this dress.
I made a toile (a.k.a. Muslin - which is a test garment) using some muslin.
I traced the seam lines onto my toile.
I actually accidentally traced and thread traced the seam lines onto the toile.
To fix this I just used the quilting guide on my sewing machine set to 5/8" and traced the seam lines.


I started by fitting the bodice. I thought this would be the hardest part to fit, but once it was done the rest would go smoother. I picked a size 20 on the pattern and compared my measurements with the pattern. They were pretty close so I thought I'd sew the straight size to see how it was.

I inserted an upside down zipper to make trying it on easy. I nearly sewed it in with the stopper at the waist - lucky I dodged that bullet.


When I sewed it up the waist was too tight. So the first adjustment I made was to increase the waist seam.


From there I made an FBA (full bust adjustment)

The original front bodice pattern

The front bodice pattern with the FBA adjustments
I did a final muslin and was happy with the fit so I moved on to my fashion fabric and lining fabric.

That's enough for now I think.

Until next time,

Do you like to remember the nitty gritty of something you make? 
If so, How do you make notes about it?
Leave a comment below, I'd love to hear from you :)


Until next time,

Friday 21 February 2014

::Sewing:: The Great British Sewing Bee

Squee! The Great British Sewing Bee is back for season 2!

BBC trailer


Find out more information here.

Now all I've got to do is find a way of watching it ;)

What are your go to DIY and crafting TV shows?
Leave a comment below, by clicking on the comments button


Until next time,

Wednesday 19 February 2014

::Ponderings::Do you have Schizocraftia?

Well, do you? What do you mean you don't know how to check to see?


There is a quiz posted on The Aftercraft so you can check to see if you suffer from Schizocraftia.

Here are my answers…

1.) You have skipped meals because you are too busy making things. one point
Nope

2.) You have been late for appointments, work etc because you have been crafting. one point
                Yep – (Tally: 1 point)

3.) Have have done both 1. and 2. in the same day. two additional points
                Not yet

4.) You have started a new project even though you have 5 unfinished ones... because this one will be quick right? one point
                Of course! – (Tally: 2 points)

5.) You understand that crafting is about WANT not NEED. one point
                Is it though? – (Tally: 3 points)

6.) You have more drawers full of fabric/crafting supplies than you do clothing. two points
                *sigh* it’s true – (Tally: 5 points)

7.) You own more than 4 pairs of scissors.            two point
                Sad, but true – (Tally: 7 points)

8.) You have a "special" pair of scissors.  one point
                You know it! – (Tally: 8 points)

9.) Your sewing machine has a name. one point for each machine
                Nope

10.) You read that and thought that is a great idea. one point
                *blushes* how did you know? – (Tally: 9 points)

11) You have fabric that is older than your children/job/pet. two points and additional 3 points if you have fabric older than you.
                Probably – (Tally: 11 points) &  So, I have some hand me downs… - (Tally: 14 points)

12) You feel nervous bringing home new stuff in case your partner notices. "MORE? Really?"  two points
                Not really

 13) Some days you secretly wish you didn't require sleep so you could get more done. one point
                No, I like sleep way too much.

14) You have pulled more than one 4am'er so you can finish before your deadline. two points
                Nope, see answer to previous question :)

15) Your inability to walk past a craft store without "just a peek" one point
                Yep – (Tally: 15 points)

16) You go to craft fairs and end up holding out buying things because you think you can make it cheaper AND better. one point
                That’s definitely happened – (Tally: 16 points)

17) You do or have spent more on crafts than food. two points
                Once or twice – (Tally: 18 points)

18) You would rather spend more on crafts than food. one point
                Hmm, haven’t really thought about it, No.

19) Your stash will out live you.
                Probably – (Tally: 19 points)

20) You have more glue and tape in your supply cupboard than your significant others tool box....( and they are kinda jealous about that.) one point
                Not quite ;)

21) You've have had the equivalent to road rage... which I will call Machine rage... if you don't understand this.. you probably haven't had it. one point
                That’s probably happened – (Tally: 20 points)

22) You own a small rain forest of books and magazines... and have managed to complete at least 2 projects from them. 3 additional points if you have NEVER made something from your books/magazines.
                Hmmm I can think of 2 things that I've made using my craft books – (Tally: 21 points)

21 Points! Looks like I've got a case of Schizocraftia.

Do you have a case of Schizocraftia?
Hope over to The Aftercraft to take the quiz :) 

Oh! If you feel like it come back here and leave a comment below with your diagnosis, I'd love to hear how Schizocrafty everyone is  :)

Until next time,

Saturday 15 February 2014

::Sewing::FO:: Navy Paisley Sorbetto

"You're a pretty hedge......"
"Oh hey!"
"No, I wasn't just talking to the hedge. I'm just standing..."
"Well, this is awkward"
"Hey, let's dance!"
"You're not dancing..."
"Alright, I'll make you dance with my kung fu moves!"
"Why am I wearing a hat? I'll give you a clue.
It starts with B and ends with ad-hair-day"
I've worn my tawny Sorbetto (mentioned in this post) nearly to death. So it's about time that I make another Sorbetto to put into my wardrobe rotation (I never wear this one).

I cut the fabric for this out in front of the TV as a break when I was making my Navy S2444 dress. I've had the fabric in my stash for over 12 months (I know because I showed to you here). It's a cotton Japanese Tana Lawn.

I sewed this over the past week in 3 x 2 hour-ish sessions. The part that took the longest was binding the armholes and neckline.

As this top is a navy bluey colour I'm going to count it as a Sewcialists Blue February make. Oh Yeah!

~Changes I made this time~

  • I raised the back neckline. I found the shoulders on the tawny one I made slip and slide all over the place so I thought raising the back neckline would fix that.


~What I Like~

  • I really like the colour and print of this fabric. The main navy colour is part of my colour palette.
  • I like that its a light and airy fabric. Something really important for warm Brisbane weather.
  • I like the raised back neckline, as it does stop the shoulders slipping around.

~What I Don't Like~

  • The armholes gape a bit so my bra peaks out sometimes.
  • The front neckline gapes a bit too, but that's probably got something to do with the quick and dirty neckline binding I did - Progress not perfection ;)
  • It's a bit shorter than the tops I tend to be wearing these days, but looking at the pics it looks ok.
  • I prefer sleeves to cover up my "cuddly" and pastey white upper arms.

~Changes for Next Time~

  • I think some of the armhole and neckline gaping is because the top halve of the garment is too big. To overcome this I should make it in a smaller size and do a Full Bust Adjustment.
  • Maybe add an inch or 2 in length.

STATS
After my last post I thought it would be interesting to track the "value" of a garment. Although I should mention that a lot of these numbers and amounts a very rough. So expect a lot of "ish"es :).
Fabric1.5ish metres (but there a some scraps)$18.60
Notions
  • bias binding - a metre and a half-ish = $1.05ish
  • Thread - a third-ish of a 100m spool = $0.90ish
$1.95
Time6-ish hours (* $16-ish Australian minimum wage) $96.00
Total
$116.55

Wowzers! When I see those numbers it blows my mind. It hits home about the 'true' cost of making something. It makes me wonder too about how shops make their clothes so cheap.
The time cost is interesting. I really enjoy making things so I don't really consider time as a dollar value when I'm making something.

~Final Comment~
Overall I am pretty pleased with my second (wearable) Sorbetto.

What do you need to add to your wardrobe rotation?
What do you think about the cost of clothes at the shops?

Leave a comment below by clicking on 'Comments'
I'd love to hear from you :)

Like my Facebook Page for updates :)

Until next time,

Friday 14 February 2014

Happy Valentines Day!


I'm probably going to spend the night in with Mr S. Eating bad food and chocolate.

What are you going to do?
Leave a comment below :)


Until next time,

Wednesday 12 February 2014

::Top Tip:: Getting Grease Out of Fabric

Back when I showed you my Navy S2444 Dress I mentioned that I had gotten grease on the bodice.

I ran it through the was and the stains didn't come out. I was devastated. I have had other clothing get grease stains that didn't come out. So I hit the internet searching for how to remove grease from cotton and cotton blend fabric (the dress is made of a poly cotton).

There was a lot of advice out there. There was some for vinegar, bicarbonate soda, baby powder, toothbrushes. *sigh* But the simplest solution I came across was...dish soap. Which makes sense as dish soap is designed to remove grease.

"It is I. Dish Soap. To the rescue with my tea towel cape!"
I just put a couple of drops on each stain. Worked it in with my hands and rinsed thoroughly a few times. I let the dress dry to see if it had worked. It had so I then ran it through the washing machine on a gentle cycle.

Phew. What a relief!

Here is a great reference if you get grease on your favourite clothes.

Have you ever been devastated by damage to your favourite clothes? What did you do?
Leave a comment below, I'd love to hear from you :)


Like my Facebook Page for updates :)

Until next time,

Saturday 8 February 2014

::Ponderings::The Cost of Handcrafting and it's Sustainability

Hey,

Today I'm posting about what can sometimes be seen as a touchy subject - the cost of handcrafting things and how to sustain your creative outlet.


Lately I've been really interested in the topic of entrepreneurial handcrafting. There is a lot that goes into having a business, let alone a business around your creativity and productivity. So I have been reading a lot about the cost of handcrafted goods from a business perspective.

Then there's the personal perspective of the cost of handcrafted goods. I was reading this blog post about the true value of making a quilt for a gift.
First there's the raw materials that go into a handcrafted project, sometimes they need a large investement. Then when the time spent on the project is factored in the 'true' cost of a project can really add up.(especially in countries where the minimum wage higher than the international average)

Anyway, why am I talking about this?  You may notice a few changes around here at SimpleFibreLife in the near future. I'm going to be adding adverts and affiliate links to my blog. Let me explain...

I am currently between jobs. I have been for awhile. It is hard to sustain my creative outlets without my own disposable income. So putting adverts on my blog and having affiliate links are a way to raise some funds to put back into my sustaining my creative projects. Which I will not doubt share with you. It's the circle of life blogging.

All this came about because I'm writing a bunch of book reviews this year and I wanted to link to the books themselves on a website that I would buy the books from myself. When I looked into it I learned about affiliate programs. I would usually buy my books from Book Depository so, where possible,  I'll link to them using affiliate links.
I should add here that these books I'm going to be reviewing have not been gifted to me. I have purchased these books myself using my own money or gift vouchers that have been given to my buy friends or family.

Don't get me wrong I don't expect to make a million bucks out of this exercise. I make things because I love to make things, but the reality is that materials that go into making things cost money. Hopefully this 'commercialisation' of my blog will contribute to those costs.

Why am I sharing this with you? Because I'm all about transparency and if I were in your position I'd like to know what's going on.

I hope I haven't put anyone's nose out of joint, but these are realities of life and I'd rather be open, honest and frank about it than pretend it's not the way it is.

How do you sustain your creative outlet?
Leave a comment below, I'd love to hear from you :)

Until next time,


P.s. Yep. I totally drew that image. I'm pretty rad with MS Paint  :P

Tuesday 4 February 2014

::Sewing::FO::Navy S2444

Did I meet my first sewing ambition for 2014!
I sure did! But only just...

I wore a handmade dress to the first wedding I attended in 2014; but I was sewing on the day of the wedding. Luckily the wedding was in the afternoon/evening.

The construction was going smoothly enough but there were a few hiccups.
I had basted the back seam shut to insert the zipper and hand basted the zipper in ready for machine sewing the next day.
The next day I decided that I was going to undo the seam basting before I machine stitched the zipper in. What?! Why!?
So as I was machine stitching the centered zipper the waist seam shifted a bit. Could have been easily avoided. Grrr.
Note to self: Morning brain, you do not know better than evening brain!

As I was hemming my dress my overlocker decided it was a really good time to chuck a sh*tfit. So I just overlocked what I could and just hemmed the damn thing.
Note to self: don't leave making a dress to the last minute in case you have a hiccup like this!

My hemming and zipper hiccups
Anyway, even after all that blah stuff happening. I'm pretty happy with my first ever dress. Here is a quick snap of the insides.

I hand sewed the bodice lining at the waist and to the zipper
I would have posted this sooner but I forgot to pictures on the day. 
Doh!
When I got home I realised I somehow got a massive grease stain on the front so I had to wash it before I took photos. I had a lot of trouble getting the stain out, but I got there in the end.
Note to self: Stop eating like a caveman!

On Sunday afternoon I thought I'd better get on and post this dress. So, I quickly recreated how I styled my dress at the wedding. The sun was right the time was right, but my hair was very wrong. I tried to wrangle my locks into something barely respectable, but there was not cooperation. So, I just slapped on a hat.


I somehow coaxed Mr S into taking pictures. He was a very reluctant photographer. So here is an outtake action shot of me giving some 'constructive feedback' ;P

"Back up! You don't have to be so close, I'll crop it later"
So I'm still kinda on track with my sewing ambitions for 2014. I have to admit my exercise ambition isn't going so great, but hey I'm doing better than I was before :)

How are you travelling with your 2014 ambitions so far?
Leave a comment below, I'd love to hear from you :)

Until next time,