Showing posts with label Pyjamas. Show all posts

Thursday, 27 June 2013

::Sewing:: Pj trousers for Pyjama Party '13

I've been wistfully reading along with Karen's Pyjama Party Tofino Style posts.
I wasn't going to play along even though I'd already bought some lovely flannel to make a pair of pyjama trousers as the ones I made last year get so much wear in winter.

I really wanted to buy Sewaholic's Tofino pattern when it first came out, but couldn't justify it. I really like this version from Suzy Bee Sews with pocket built onto the side panel. POCKETS! You know how I feel about pockets :) The tutorial for how she added pockets is here.

So I thought I'd sit out for this pyjama party and play along at my own pace. But...after seeing all the posts about pyjamas in the blogosphere after the pyjama party launch I couldn't not join in.

So last night I laid out my fabric on a freshly vacuumed carpet and cut out the pattern I used for the last pyjama party. (Note to self: cutting fabric on carpet is dumb!) Snip, snip!

I chain sewed the inner leg seam (there's only one leg seam on each leg. Totes awesome if you need to whip up some pyjama trousers in a jiffy). Zoom, zoom!

I chain overlocked the leg seams.  Brrrm, brrrm.

I did the same for the crotch seam. Zoom, brrrm!

When I went to try them on. I stopped. Which way was the back? I'd overlocked the crotch seam without thinking to mark the back (or front for that matter) in an obvious way. Gah!

I took my pattern out again and compared the shape of the crotch curves and decided which way was the back and stuck a safety pin in the back seam allowance to mark the back. (I'm pretty sure I've made that mistake every single time I've used this pattern. Derp!)

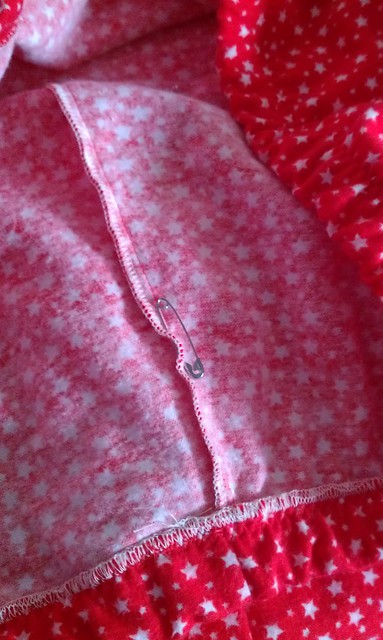
This is the back Vanessa. The Back!
I tried them on and they fit like a dream through the leg. I marked where I wanted the waist top to be folded over and pressed. (To make my pants sit level I needed to remove more from the front than the back. Hmmm interesting. The signs of the need for Full Butt Adjustment/Swayback Adjustment me thinks.)

Woohoo! Halfway there! All I had to do was to elasticise the waist and hem the bottom. It was getting on in the evening and I had to get some sleep.

This morning I was laying in bed pondering about how I was going to attach the elastic in when I remembered this post from Sarah at Sew Squirrel which led me to Melissa's fehr trade post.

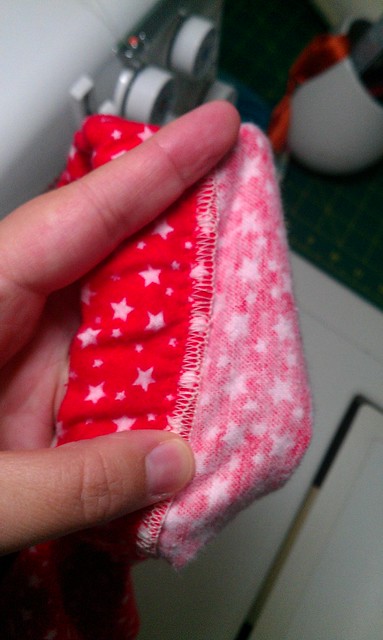
Overlocked and tricot stitched waistband.
Using only the LH needle I overlocked the elastic to the WS of the waist. I aimed the elastic to the marker for the RH needles so that it wouldn't get chopped up by the blade. Then I turned it down on the WS and tricot stitched it down. No twisty elastic for me HAH!

If I were to do this method again I would overlock the waistband to the RS of the waistband then turn in to the wrong side and then turn it under again (does that make sense?) That way the elastic would be completely concealed. It may create a bit of bulk, but with pyjamas, it's probably not that big a deal. (Or maybe flatlocking could help reduce bulk. Hmmm.)

Anyway, I wanted to take pictures in natural light so this morning after I'd attached the waistband I took a couple of piccies. One of the few times when the only full length mirror in the house happens to be the mirrored wardrobe doors in your bedroom :)
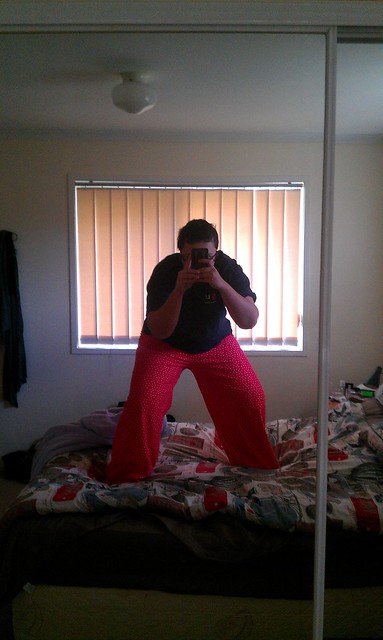
Bounce!
Finally, these evening I hemmed my pyjamas and I'm wearing them RIGHT NOW! And they are lovely and flannely and cozy and lovely. And I'm sooo glad I made them! And that my friends is how you go from 'Nah, I'll sit this one out' to 'Hey, hey! I've made pyjamas too!' in 48 hours :)

So now that I'm finished I'm gonna link my red fabric with white star clad butt up on Karen's Pyjama Party Launch post.

Until next time, I hope your getting involved with things that make you cozy.
Vanessa xoxo

Saturday, 28 April 2012

Pyjama Party Sewalong - FO: Orange Pyjama Pants

Yay my Pyjamas are done! You can read about me putting them together here.
Here's a couple of quick action shots of me wearing them.


They are sooo comfy, I like the loose fit, the long length and the not too tightness of the waist elastic (I detest it when trousers ride up to my waist as I go about my business)

Also, as per request from Karen, I'm still in the midst of reading Sherlock Holmes: The Complete Novels and Stories - Volume II.

I really enjoy this read. I really feel sad when I finish a book I really enjoy, so when I find one I really like I savour it and take as long as possible to finish it. Another book I'm slowly making my way through is Roald Dahl: Collected Short Stories. I really enjoy the interesting twists in these fantastic bite-sized stories. Just fantastic.

To finish I'd just like to say a big 'Thank You' to Karen of Did You Make That. This is such a fantastic idea for a Pyjama Part Sewalong and I really enjoyed it.

I hope you're relishing what you're reading at the moment.
V xo

Pyjama Party Sewalong - Elastic Casing, Hemming, and Done!


When I last left you all I needed to do was sew the elastic casing and hem my pyjamas.
My plan was to do this during the week. In fact we even had a public holiday in the middle of this week, but alas, as it sometimes does, life got in the way and I lost my sewing mojo.

So in order to make sure I was on time with the Pyjama Party Sewalong I quickly sewed the last few bits this afternoon.

First off I with inspiration from the Pyjama Party Sewalong hostess Karen, I sewed a hanging loop for the back of my pyjamas.

2 inch strip of fabric
folded RST
sewn a 3/8 inch seam
pinked the fabric fairly close to the stitch line
turned the fabric tube RSO
pressed and it's ready to install

The (not) fun part of measuring and pinning the elastic casing and trouser hems came after that. While I was measuring, pinning and pressing I thought I may as well do it for both the waistband and trouser hems at the same time, it saved me having to go back and do the other.
waistband had 1/2 inch turned under
the waistband was 1 1/2 inches wide to
accommodate the 1 inch wide elastic
while pinning the waistband I inserted
the hanging loop I had made earlier
I just folded a 2 inch hem on the
trouser legs, as I had already
overlocked the edges

Now I was ready to sew! Woo hoo!
for the waistband I sewed along the bottom of the casing,
making sure I was catching the folded under edge
for the waistband I also made sure to leave
an opening to insert the elastic
the trouser hems were nice and easy; I just sewed and made sure the
bottom of the hem ran along the edge of the throat plate

I was pretty pumped to insert the elastic, it meant I was an little bit away from being done. Oooh Yeah!
to make sure the elastic didn't get lost in the casing I safety pinned one end to the inside near the opening I had left. I inserted the other end into my trusty (and sometimes frustrating) Clover Easy Loop Turner.
the elastic al ready to be threaded through
the waistband elastic casing

I threaded the elastic through, making sure not to twist it as I was moving it through the casing. Once the elastic had been threaded through the casing I safety pinned the two ends together and tried them on to see if there was too much slack in the elastic. There was a little so I readjusted my safety pinning to make the elastic a little shorter and that did the trick. Not too tight, so as to cut of circulation, but not too loose that I'd be worried my trousers would drop at any moment.
the elastic after I had fitted my trousers
 When I was happy with the elastic sizing I just zig-zag stitched the overlapped ends of the elastic back and forth a couple of times to secure the elastic.
the elastic ends all fastened together and
ready to keep my pyjama trousers from
falling down :)
All I needed to do was stitch the opening to the elastic casing closed and I was all done. I set the stitch a bit longer. I thought it would make it easer for in future if I needed to readjust the elastic (or something).
the waistband elastic casing opening
stitched closed
Aaand then they were done! Oooh yeah! Sooooo great! In fact I'm wearing them now because there are sooooooooo comfortable.
Here are my jammies, done and done!
the inside and the hanging loop
the hanging loop in action -
what a brilliant idea!

And that's all she wrote! (well that's all I've written about my pyjama trousers anyway)
Hope you are enjoying the fruits of your labour!
V xo

Wednesday, 25 April 2012

Pyjama Party Sewalong - Sewing the Crotch Seam

When I last left you I had two pyjama trouser legs ready to be joined together for as long as they both shall trouser.
2 single pyjama legs aren't very useful

So from here I had to turn one leg right side out (RSO) and insert it into the leg that was wrong side out (WSO) so that both trouser legs were RST. Are you picking up what I'm putting down? Check out my visual below.
1 - Turn one leg the
right side out (RSO)

2 - Insert the RWO leg
into the other leg

3 - The crotch seams should be
matched up 
4 - Here you can see all the layers
Now the legs are
Right Sides Together

So now when I held hold front and back of the crotch seam and spread it out I got a lovely big smiley crotch single crotch seam.
matching crotch seams

Now when I pinned together this seam I started by matching up the seams that had been created by each trouser leg.
matching leg seams

I pinned on either side of the seams as I find this stops the seam allowances (SA) from moving around too much as I'm sewing over them.
securing the seam allowances from the leg seams
matched up 
here you can see the back of the seam pinning

After matching up the seams I pinned together the notches at both ends of the seam.
pinning notch seam clips

Then I just pinned at regular intervals along the crotch seam between the start and end, notch and trouser leg seam pinning I had already done.
pinning on the crotch seam

Then I just s l o w l y sewed the curved seam.
sewing over the pins - AGAIN!

Check my awesome seam crossover section. I'm pretty pleased with it.
pant leg and crotch seam crossover.

I pressed the seam open by laying first the front and then the back over the pointy end of an ironing board.
pressing the crotch seam open

To make the inside look nice and neat, and hopefully make my pyjama trousers snuggly-ness last heaps longer-er, I overlocked the seam allowances of the crotch seam.
One side down, the other to go

While I had the overlocker out I thought I may as well do the waist and leg openings too (this is mainly because I'm a lazy bum and just wanted to put my overlocker away :) )

overlocked waist opening

....And here we are, ready for the final step.
almost done.....

That's all....for now... folks,
V xo

Sunday, 22 April 2012

Pyjama Party Sewalong - Sewing Leg Seams

Sewing the inner leg seams is the easiest of the easy steps for these pyjama trousers. I folded each leg right sides together (RST), matched up my notch clips and pinned the sides.
my pinning and you can see the notch clip, pinned second from the left
While sewing the leg seams I forgot to kick out at the foot end of each trouser leg. Exactly what Jane, the Pyjama Party Sewalong, from Did You Make That advised you should do! Oh well, I'll see how painful it makes my life later. :)
You can see where I forgot to kick out my seam. Oops!
You'll notice that I've sewn over my pins. I shouldn't do that, but I do for speed. Aaand because I'm too lazy to keep stopping and starting to take out the pins while I sew. Aaand because I wear glasses I'm not afraid that if my needles snaps it's going to ping me in the eye. So if you do it, it's at your own risk! You've been warned!
I'm naughty, I sew over my pins.
Shhh don't tell!
After sewing the leg seams I decided that I wanted to finish of the inside of these trousers nicely so they don't gradually unravel over time. So I decided to overlock the raw edges.
the newest member to my sewing team-Janome 8002DX
I bought it a couple of months ago, but it's still new to me :)
While I was overlocking I noticed that the stitch length randomly changed, but I think it came down to whether the blade was cutting the edge or not. If it was, the stitch length was as I had set it; if it wasn't cutting then the stitch length was smaller. Weird! Anyway it doesn't matter, all I care about is that my seams won't unravel into an oblivion.
the different stitch lengths on either seam - strange!
So after these efforts I ended up with two pyjama trouser legs. Yay!
my pair of pyjama legs - Woohoo!
Note to self, sewing fluffy flannel and wearing black jeans don't mix! Which reminds me I really should add making a crafting apron to my list of things I should make.

I'll catch you later with some further progress soon!
Hope your doing something that makes you feel all warm and fuzzy inside (but please don't eat any wool!)
V xo